
Part 1: Introduction
For some context, this guide was written because my peers and I found our journey through CS30 IB to be difficult and overwhelming as a result of the limited resources and
unclear information surrounding the course. This was written with the intention to help some of you out, to get the ball rolling, so that theres a clear framework on how to
approach the course effectively. Warning
1.1: What is the Internal Assessment
In a nutshell, the Internal Assessment for CS30IB is a practical project where you reach out to a client and develop some sort of software or product; usually a website, mobile application, or video game.
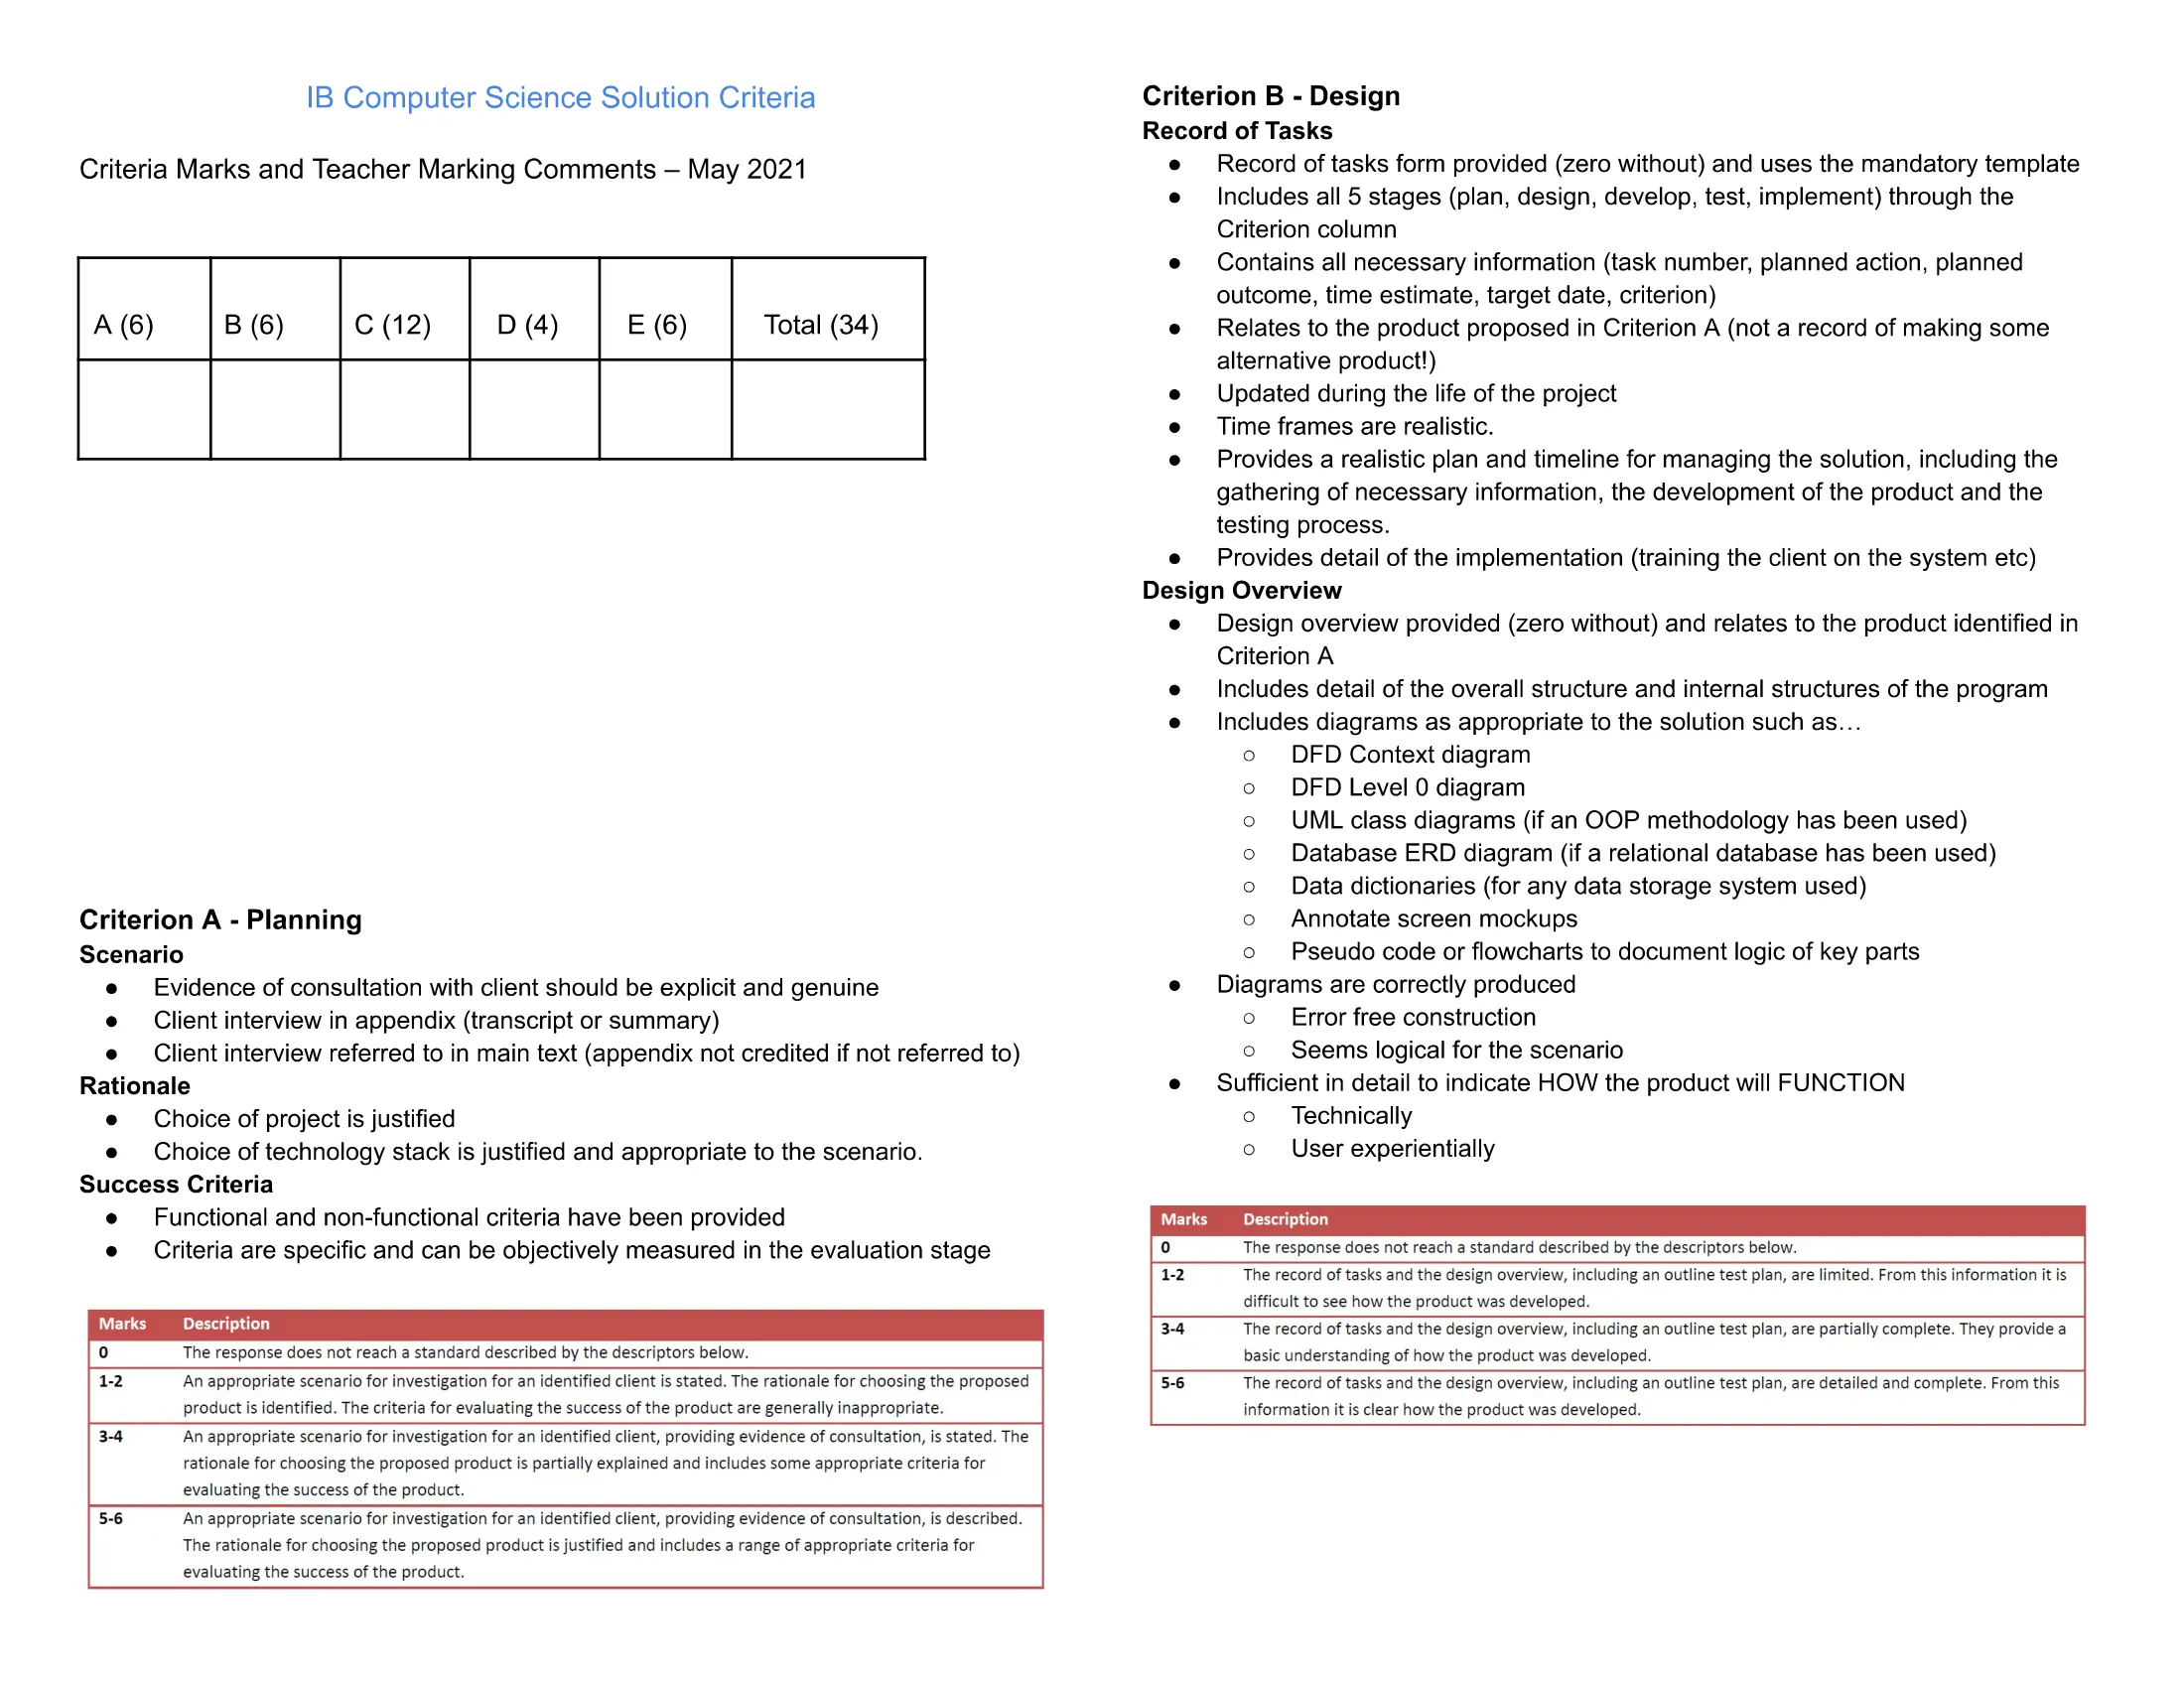
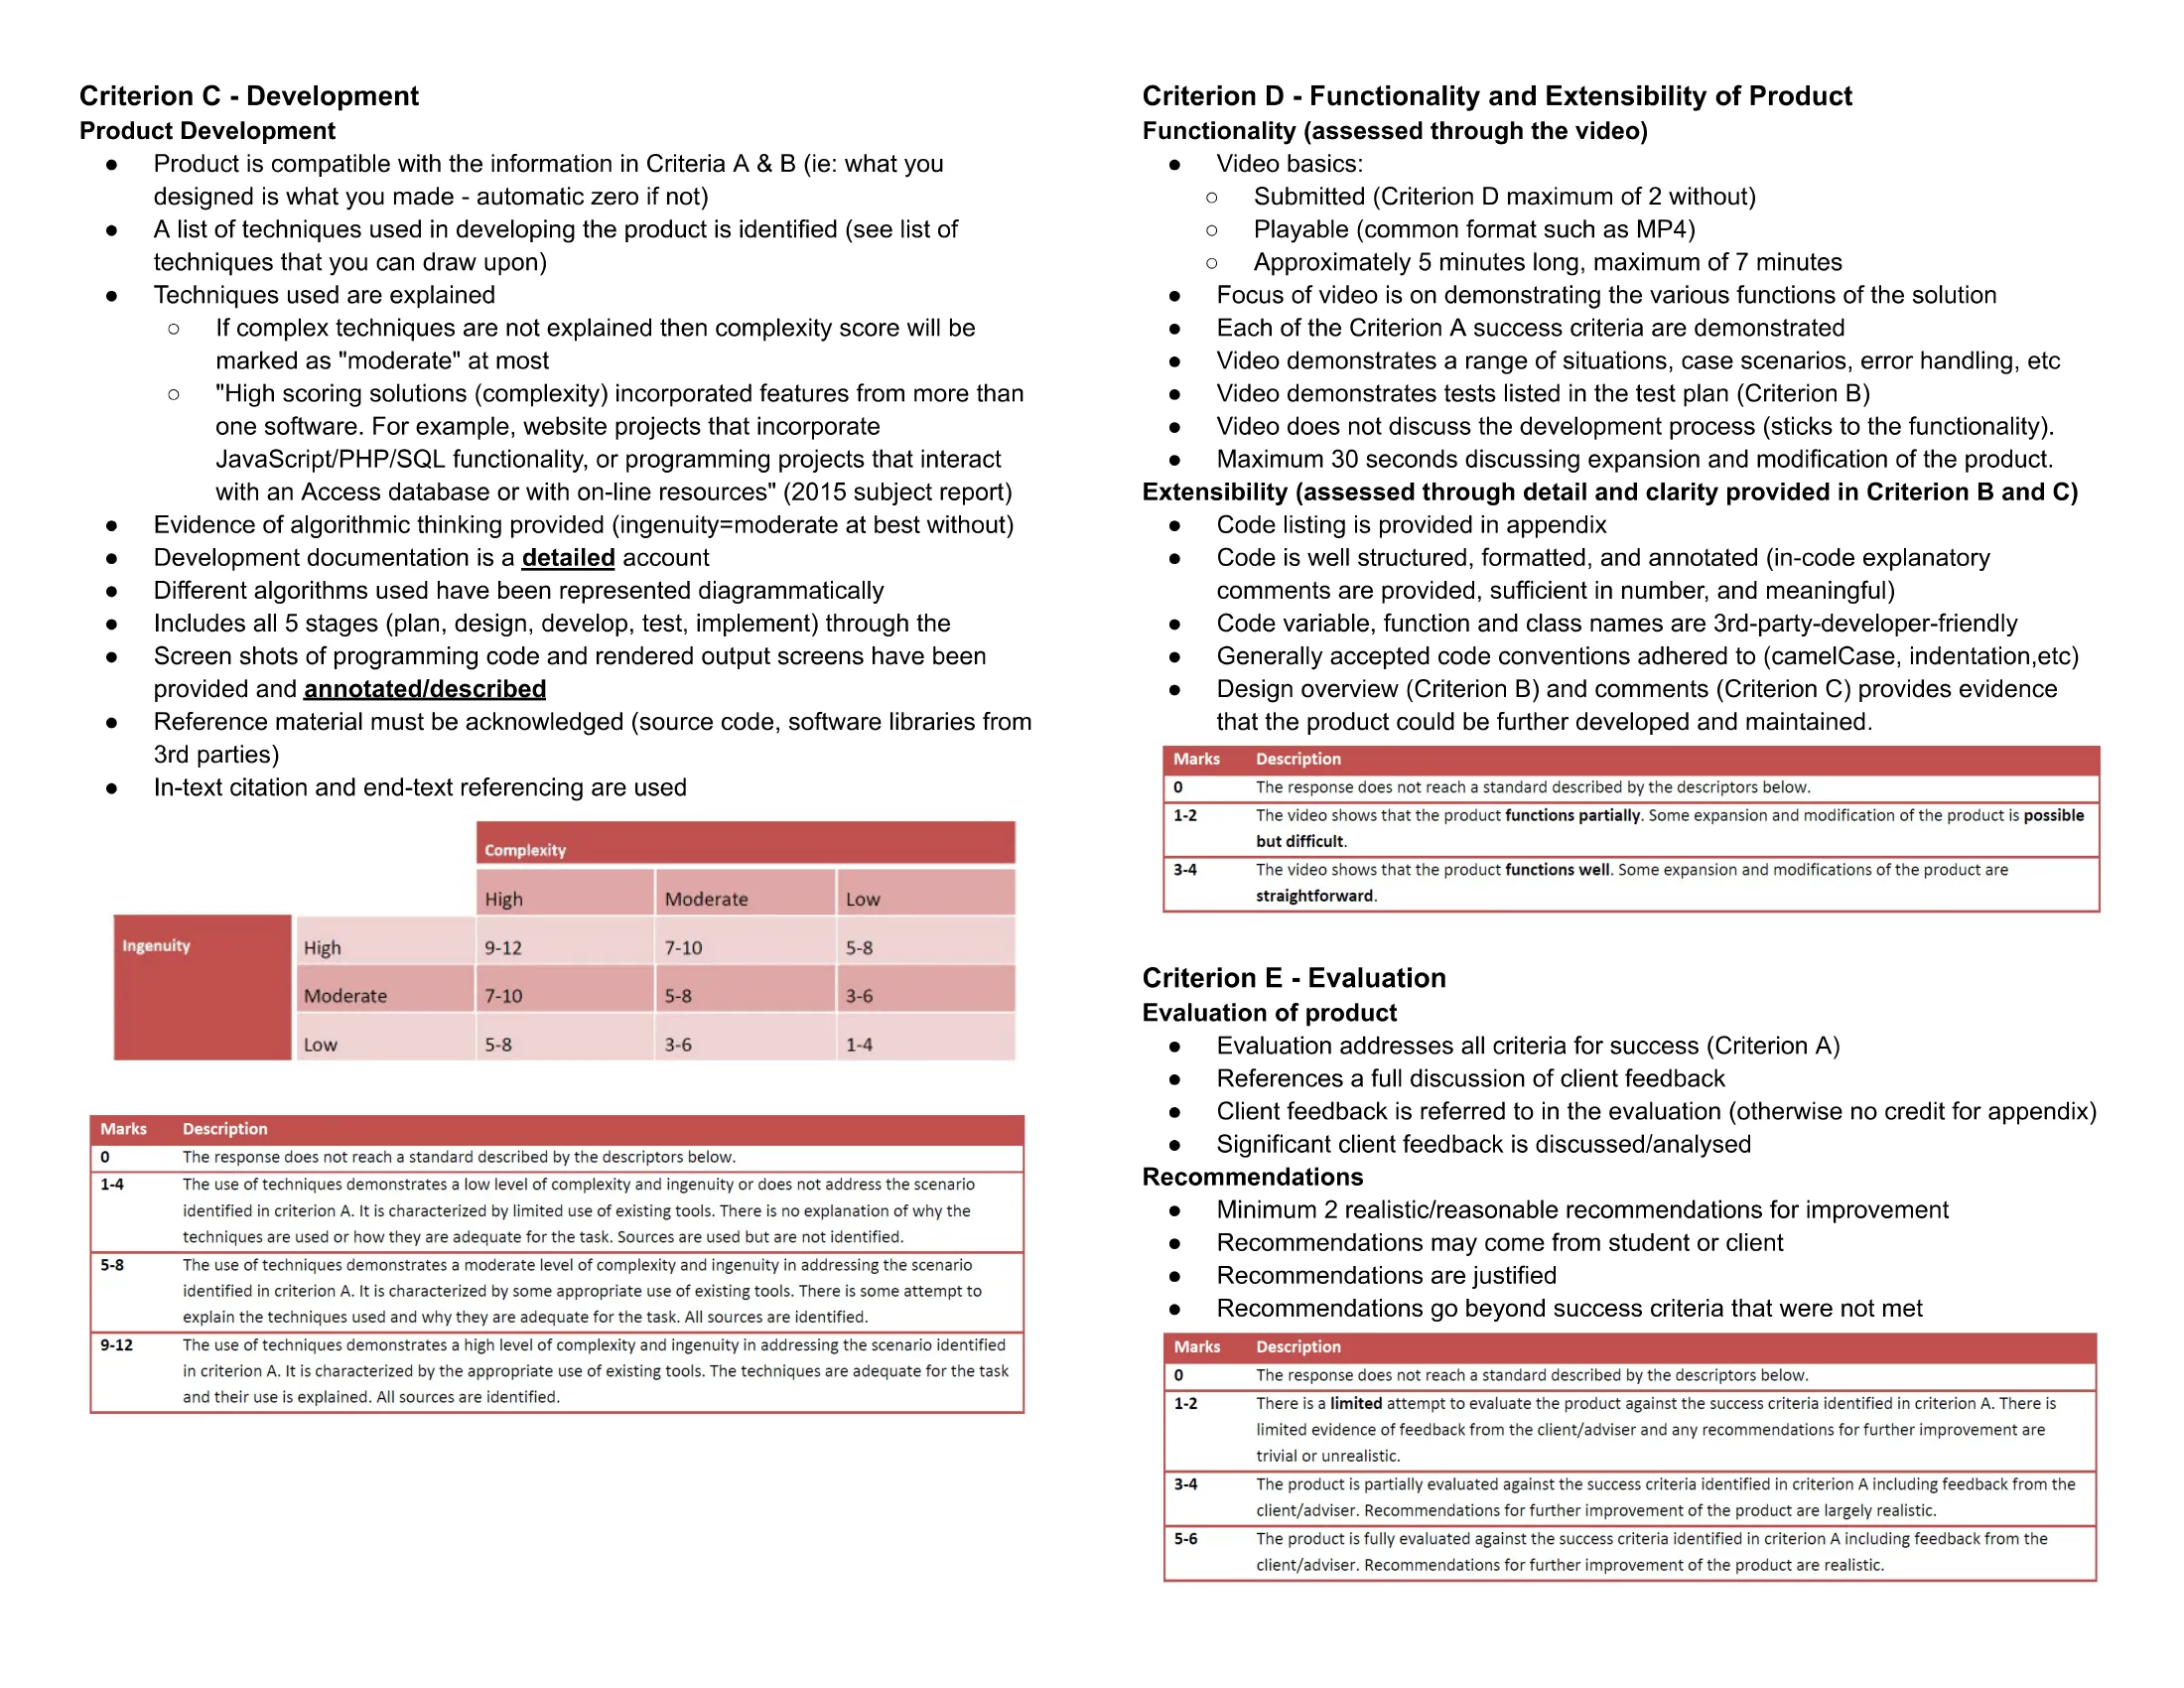
1.2: Criteria and Rubric
The criteria for the internal assessment is standardized and is shown below for each of the sections being marked. It’s recommended to refer back to it regularly.
1.3: Finding a Client
Unlike other IA’s, you need to find a client for this project. Generally, the following groups of people are recommended to reach out to:
- Parents, siblings, or relatives: This is probably the easiest method and is recommended because of its flexibility. Most people should choose this option.
- Teachers or school staff: Also easy to get a client this way. However, there is much less flexibility in both software requirements and communication as most teachers/staff are busy.
- External persons: This is much harder, but if you have the connections (to a business for example), it can be a viable option as well. Flexibility varies between individual clients, but generally there isn’t as much freedom.
You can have a close friend (or even yourself) be a client, but it’s highly recommended against. IB has a record of marking lower on projects with these types of clients.
Danger
Please do not accept a request for a highly complex project as it will only make your life harder.
There is more on this topic to be discussed, but IB markers don’t care about the complexity of your program itself. They mostly care about how complex you make the program seem on your writeup. With this in mind, accept a project with a simple set of features and instead use extensive techniques (complex algorithms and data structures) to expand on your code.
Tip
It’s extremely advised to find a client within the first 2 weeks of school to allow time for planning and Section A.
1.4: Timeline
Your teacher will give you general due dates on when certain parts of your IA are due. It’s important to adhere to these due dates if possible, especially near the end of your IA, as you will begin to see an increase in workload and will not have time to work on your project.
The general timeline is as follows:
| Time Period | Tasks |
|---|---|
| September | Client discovery and Section A |
| October–November | Learning Fundamentals and draft of Section B |
| December–January | Learning Advanced Concepts, starting Section C, and finishing Section B |
| February | Section D and Section E |
Warning (Late stage planning risk)
Your IA will be due in sometime after February, likely March or April, however, it is highly recommended that you hand it in by late february or early March at the latest. You will likely be much busier at this time and the addition of extra content to your writeup or project will net diminishing returns.
Part 2: Writeup Guide
This section is only meant to serve as a guide, not a step by step tutorial, so essential points are kept concise. A general overview of what to expect for each section will be given by your teacher.
Important
Make sure you follow your teacher given exemplars religiously. This is very important.
Tip (Writeup remarks)
- It’s recommended to use Times New Roman or Arial. Size 12, 15, and 18 for normal text, small heading, and large heading respectively. Its important to keep this consistent among all sections.
- The title of all your main section documents should be in the format “Criterion X: Name of Section.”
- Appendices should be named Appendix_A and Appendix_B.
- Keep all your writeup files in a folder within your Google Drive to stay organized.
- Always keep referring back to your client conversations in your appendix throughout all sections. It’s important to note that references to your appendix are not considered towards your word count.
- After handing in your section to your teacher on classroom, follow their commented advice. Look through each point of feedback and fix whatever they feel is wrong.
2.1: Section A
Note
Section A is meant to be short and completed within the first month of the school year. This is your chance to get some easy marks.
For your scenario, talk concisely about your clients problem, what solutions they tried previously, and a vague description of what they want—including features and type of application. Refer back to your appendix as much as possible here.
For your rationale, talk about what application you’re making, what features it will have, and what technologies/frameworks you are using to accomplish it (and why those certain frameworks are being used).
Your success criteria should consist of 7 bullet points—no more and no less. All bullets must concise and relate to each feature that your client wants.
2.2: Section B
Section B is more difficult, especially since you likely won’t have a clue on the structure of your program. Therefore, it’s recommended to do a couple parts of section B and add more as you finish developing. This consists of adding vague structure based diagrams that don’t require you to have started coding.
Your “Test Plan” should be a copy paste of your requirements from Section A, with your test plan steps being your process to check if each requirement is met. Be as specific as possible.
Example (Good vs bad test plans)
A bad example of a test plan is the following:
- “Try adding an item and see if it shows up on my web page.”
A good example of a test plan is the following:
- “Log in as the client and navigate to the catalogue page. Attempt to add a new item, such as a ‘Caliper’ and observe if the item appears instantly in the inventory list with all entered details. Modify the item by updating fields like quantity, and confirm that the change is immediately reflected in the list. Finally, delete the item and check that it is fully removed from the inventory.”
Some diagrams to include in Section B (you can put much more than just these):
| Before Development | After Development |
|---|---|
| UI Mock Ups | UML Class Diagram (if applicable) |
| Context Diagram | Algorithm Flowchart |
| Top Down Diagram | |
| System Flowchart |
Tip (Section B efficiency)
As of writing, these were the only diagrams I put on my IA, with minimal effort, and managed to get the same mark as some of my other peers (who spent significantly more time). Section B is not worth spending as much time on as it may seem. It’s important to focus on quality over quantity here. All diagrams should be comprehensive, easy to see, and well structured.
Section B also consists of a record of tasks. This part is more flexible, so feel free to write with your preferred style and don’t take too long. Make sure that you have about 50 tasks and that you are constantly referencing your appendix for client interactions. Moreover, avoid discussion of your writeup.
2.3: Section C
Section C will be the bread and butter of your IA. I would recommend spending some time on this section as it’s worth double the other sections.
Again, your teacher will likely give more details about this section and what to expect. It’s highly advised to look at their commentary when you hand in your draft.
Note (IB code guidelines)
You’ll be taking a lot of screenshots of your code so it’s important to remember a couple of things.
- Screenshot background color must be light. No dark themes allowed.
- it will be difficult to fit all of your relevant code in a single screenshot so it’s advised that you only screenshot the fundamental portion of your code.
When writing about the structure of your code in Section C, you should look back to your Section A and take excerpts from your rationale. In the structure you will mostly need to talk about the different layers of your program and the technologies you’re using (and why you’re using them).
Your teacher will give you a list of techniques so you’ll just need to browse through them and put in the ones you used and add others that were not covered.
The actual writeup and difficult portion of Section C will consist of writing about 9-10 different parts of your program. For each part you need to take screenshots of the relevant code and write about the purpose of that code and techniques implemented in it. Each explanation should be no larger than a short paragraph. Be concise and make your code seem complex.
Make sure to put a reference (APA style) of all resources used to develop your program at the end.
Tip (Integrating Section B and Section C)
It’s highly recommended to copy paste all if not most of your figures from Section B into Section C for the relevant part of your code. IB markers will look for some sort of integration with Section B so this is mandatory.
2.4: Section D
Section D consists of an Extensibility portion and Functionality (video) portion. Generally, this section is not very difficult.
For the extensibility portion, copy paste your teacher given extensibility techniques list and color key highlight each technique used in your doc (use whatever colors you want). Afterwards, copy paste all your essential code and highlight each relevant portion of your code that applies to your key.
Note
If your code is too long to key everything, make sure to indicate to the marker that you will only key the first 10 pages or so of your extensibility document.
For the video portion, all you need to do is create a video 4-7 minutes long where you do the following:
- Go through your exact test plan in Section B
- Explain at least 3 extensibility features to add in the future (last 30 seconds of the video)
Warning
Speeding up your video will end up in you getting potentially 0 for that section. If your video is longer than 7 minutes, your test plan is too long and you are wasting time.
2.5: Section E
Section E is the easiest of all the sections.
For the first part, copy paste your exact test plan from Section B into your document and indicate whether each criteria was met or not. How you do this is up to you.
For the client feedback, keep it concise and talk about whether your client found your product to be satisfactory or not, what they wish could be implemented, things to improve, etc. Keep this section very short.
Finally, you’ll need to talk about your 3 future improvements. For each improvement, write a very short paragraph explaining how this would help your client.
2.6: Appendices
Your appendices are not directly marked but the IB marker will refer back to them.
Appendix A is for you to list all the resources you used during your IA. This includes all websites, books, videos, etc. that you used. Make sure to cite it in APA format. This should be similar if not the same to your references in Section C.
Appendix B is mostly going to contain transcripts of your client conversations. You can put any other relevant information that you want the IB markers to refer back in this Appendix.
Part 3: Development Roadmap
During the planning stages of your IA, the distinction should be made that Web Development is the most efficient route to take in order to get a high mark without investing too much time into your project. As such, the first section of the roadmap will deal exclusively with Web Development.
However, it’s important to discern whether your product should be a website in the first place or if it’s more appropriate to create a local application (like a Windows program). This guide won’t cover how to create local desktop applications as it’s uncommon in most cases for an IA (and often too time consuming), but if you want to anyhow, the internet is a great place to start.
Read the Web Dev Roadmap.
For those thinking of doing Game Dev, don’t. If you want marks then it’s a waste of time, however, it can be rewarding if you’re willing to put in the effort.
Read the Game Dev Roadmap.
Warning
As of writing, the mobile development roadmap is under construction
Part 4: Tips and Advice
Theory and practice are essential for the IA, but it’s also advantageous to learn from practical experience.
4.1: Advice from Other Students
Focus on your writeup over your code! A lot of people get the misconception that because this is a computer-science based IA, you’re evaluated on the number of features and how complex your code is, so they spend hours upon hours on implementing a million features and don’t have time to polish their write up. That’ll result in a poor mark. If you look at the rubric, sections A, B, and E aren’t even about your code— they’re marked on presentation and planning. So make sure your write up is polished ; the IB markers look for very specific things, so make sure you tick off every requirement in their checklist. And importantly, remember that you don’t need a complex project to score well, but a comprehensive writeup. Think about it like putting makeup on a pig.
— Alex
DON’T PROCRASTINATE! Make sure to space out and set dates for yourself to finish sections one by one such that even if you do fall behind it’s not by much.
— Ali
Use libraries if possible. Also complexity is kinda overstated like it matters but don’t focus all your time into just making the IA more “complex” for the sake of it.
— Bhabis
YouTube and GPT are your best friends + don’t be afraid to reference GitHub or look at random projects for ideas.
— Rashin
Do not be afraid to change your ideas when you need to. You’ll start with huge, unattainable goals. If you are under a time crunch, DOWNSCALE. Also, make sure to follow Mr. Karas’ deadlines well. While they are changeable, his feedback is incredibly helpful, not only for understanding what the IB markers want, but also to pace yourself as to how much you should be working on your IA.
Now, also keep in mind that your IA is actually not a large portion of your IB grade. Even if you drop a 4 on the IA, you can still get a 7 in the course provided you do well on the Exams. A great IA is awesome of course, but trying to get a 7 is hard as hell and will take an INSANE amount of effort and time that you will definitely not have.
‘Perfect code does not exist (Quote lifted from the IA IB marking guide).’ Don’t try to waste time making the best code possible. It won’t help.— Afnan
Try doing at least a couple tutorials and getting your basic functionality down before using AI. Especially with large projects, AI forgets lots of details and will make redundant code or straight up hallucinate new code. It’s definitely helpful but try to have a good grasp before using it.
— Anthony
Don’t do game dev. Please.
— Chase
4.2: Personal Advice
I’d start off by exclaiming that your IA is not very important at all. Past a certain point, there are diminishing returns. My philosophy is to do the least possible work while getting the highest possible output—and it works—because it might take 50 hours of dedicated work to bring your project to a 23, but maybe 100 hours for a 25. I managed to get a 23/34 (the minimum for an IB 6 on the project) while spending less time on my IA (relative to my peers) and even finishing it months before the final due date. I would recommend everyone else to do the same if the only thing you care about is efficiency. If you want the highest possible mark or care about developing your program beyond this IA, by all means, go for it.
To maximize your mark, I would spend as little time as possible on the actual project and instead focus on the writeup. The impressiveness of your program is nothing to most markers compared to what you can show on your documentation. It’s recommended to keep looking at previous exemplars to do this.
For people who want to see my documentation, you’ll have to ask for it—but i’ll freely give it out. Check out the roadmap subsections attached to this post if you need help starting.
If you have read this far, good luck on your IA. Make sure to do some good work, but more importantly, ensure that you have fun and enjoy the process.